Save to Pinterest
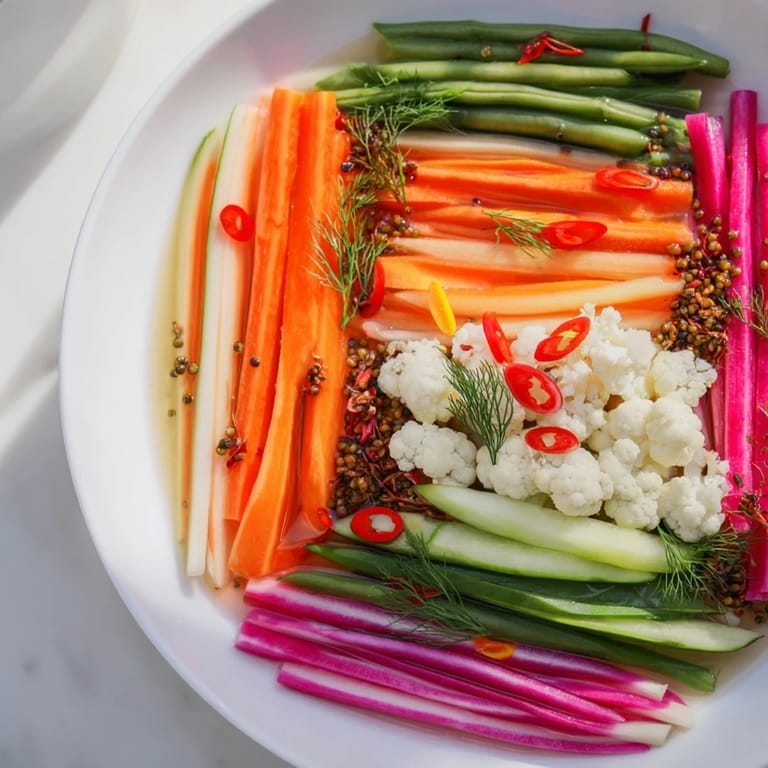
 I'll never forget the first time I arranged a board of pickled vegetables at a dinner party—it was meant to be simple, just a colorful starter while the main course cooked. But watching my guests lean in with genuine delight, picking through the glistening rows of tangy, vibrant vegetables, I realized I'd stumbled onto something magical. That night taught me that sometimes the most impressive dishes are the ones that let fresh ingredients shine with minimal fuss, and a little patience in a jar transforms ordinary vegetables into flavor-packed treasures.
My mom used to say that pickled vegetables were the secret weapon of anyone hosting without stress. She was right—I've used this exact method when unexpected guests arrived, and the board I pulled from my fridge made me look like I'd spent hours planning. The colors alone, arranged in neat lines or patterns, turned a simple appetizer into the conversation starter of the evening.
Ingredients
- Carrots, julienned (1 cup): Their natural sweetness becomes almost honeyed when pickled, and the thin cuts mean they absorb the brine quickly. I learned to cut them as thin as possible for maximum texture.
- Cucumber, sliced (1 cup): Choose smaller cucumbers if you can—they stay crunchier and don't get watery. The brine locks in that perfect snap.
- Radishes, thinly sliced (1 cup): These are the secret hero of the board. They add a peppery heat that makes people reach for more, and their pink color is stunning.
- Red cabbage, shredded (1 cup): It holds its color beautifully and adds earthiness. The thinner you shred it, the faster it absorbs flavor.
- Cauliflower florets (1 cup): Keep them small and uniform so they pickle evenly. They become slightly tender but retain their structure.
- Green beans, trimmed (1 cup): Choose thin, young beans if possible. They stay bright green and have a delicate crunch that's irresistible.
- White vinegar (2 cups): The backbone of the brine. I've experimented with rice vinegar and apple cider—each brings its own personality to the board.
- Water (2 cups): Essential for diluting the vinegar so it doesn't overwhelm. This balance is what keeps people coming back for more.
- Sugar (2 tbsp): Just enough to round out the sharp vinegar edges without making anything sweet. It's about balance.
- Kosher salt (2 tbsp): Don't skimp here—it draws out moisture and helps preserve. I always use kosher because the crystals dissolve evenly.
- Garlic cloves, sliced (2): They become soft and mellow in the brine, almost sweet. Slice them thin so they release their flavor quickly.
- Mustard seeds (1 tbsp): These add a subtle warmth and slight texture. They pop between your teeth and surprise you with flavor.
- Coriander seeds (1 tbsp): They bring a gentle citrus note that ties everything together. Toast them lightly before adding if you want more pronounced flavor.
- Black peppercorns (1 tsp): Fresh, whole peppercorns beat ground pepper every time. They release slow, steady heat throughout the pickling process.
- Bay leaves (2): They add an herbal, slightly floral note that makes the brine feel complete. Don't skip them.
- Fresh dill sprigs (3): This is where the magic happens for me. Dill and pickled vegetables are meant for each other—it's an ancient pairing for a reason.
- Red chili, sliced (1 small, optional): If you want heat, this is your friend. It gradually infuses the entire board with a gentle warmth.
- Kimchi (1 cup, optional): For those who want to skip making fermented vegetables from scratch. Choose varieties without fish sauce if you're strictly vegan.
- Sauerkraut (1 cup, optional): The cultured tang of sauerkraut adds depth and actual probiotics to your board.
Tired of Takeout? 🥡
Get 10 meals you can make faster than delivery arrives. Seriously.
One email. No spam. Unsubscribe anytime.
Instructions
- Gather and Prep Your Vegetables:
- Wash everything thoroughly under cold water and pat completely dry. As you cut, arrange each vegetable on your cutting board by type—you'll use this organized setup when layering into jars. The carrot ribbons should be thin enough that light passes through them. Your cucumber slices should be uniform thickness so they pickle evenly. Radishes thin enough to curl slightly at the edges. This prep work is where you set yourself up for success, even if it feels like the longest part.
- Create the Perfect Brine:
- Pour vinegar and water into a saucepan and bring everything to a rolling boil. Watch the steam rise, and when it's really going, add your salt and sugar. Stir with purpose until both dissolve completely—you'll feel the granules disappear under your spoon. This is the moment the brine becomes alive. Remove from heat and inhale that sharp, bright aroma. Let it cool for five minutes or so, but don't wait until it's completely cold.
- Build Your Visual Masterpiece:
- Get out your clean glass jars or bowls, and here's where you become the artist. Pack vegetables tightly, but thoughtfully—group similar vegetables together. Start with the radishes in one section, carrots in another, creating distinct color blocks that look intentional and beautiful. Leave a little headroom at the top. Think of it like arranging flowers, not just cramming vegetables.
- Add the Flavor Foundation:
- Distribute garlic, mustard seeds, coriander seeds, peppercorns, bay leaves, dill, and chili between your jars. If you have multiple jars, divide the aromatics evenly so every jar gets the full experience. This step smells incredible—you're adding layers of flavor that will slowly, patiently infuse everything.
- Pour and Submerge:
- Carefully pour the still-warm brine over your vegetables until everything is completely covered. This is important—any vegetable peeking above the brine will age differently and potentially spoil. Top everything, then press down gently with the back of a spoon to make sure no air pockets remain. The vegetables should look like they're swimming in liquid clarity.
- Seal and Cool Completely:
- Cover your jars and let them sit on the counter until they reach room temperature. This usually takes an hour or so. You're essentially letting the vegetables and brine get acquainted before the cold storage slows everything down. Then refrigerate immediately.
- Wait with Patience:
- The hardest part. Twelve hours is the absolute minimum for quick pickles—at this point they're good, bright, and crunchy. But 24 hours is better, and 48 hours is when the flavors really harmonize and deepen. If you're fermenting naturally instead, keep jars at room temperature, check daily for bubbles (a good sign!), and taste at five days. You'll feel like a mad scientist when bubbles appear.
- Arrange for the Reveal:
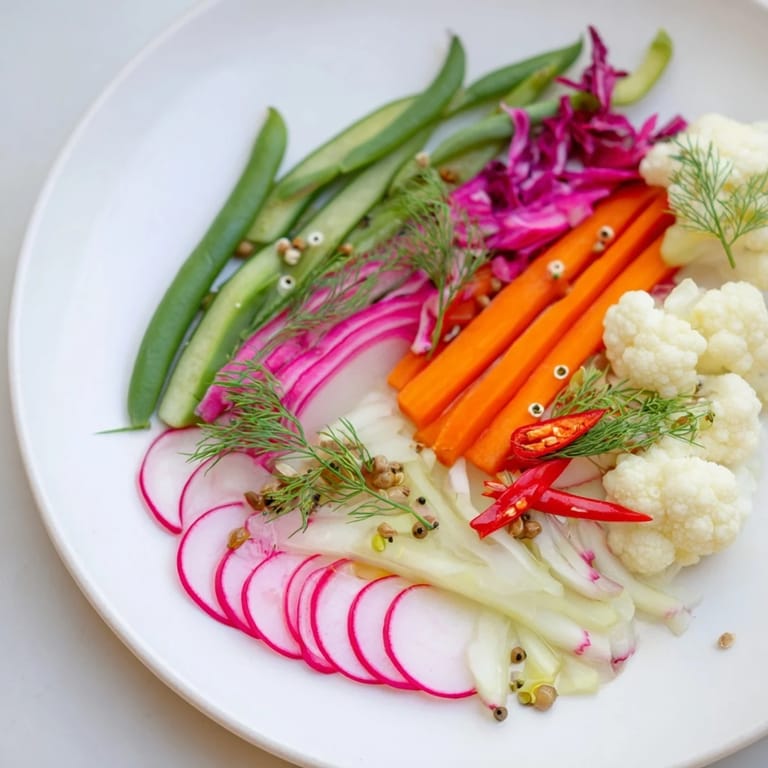
- When you're ready to serve, transfer your pickled vegetables into small jars or shallow bowls, keeping the color groupings distinct. Arrange them in lines or grids on a wooden board, a slate platter, or even a large plate. The presentation is half the joy—people eat with their eyes first.
 Save to Pinterest
 I served this pickled board at my best friend's potluck, and someone asked for the recipe before they'd even tried the main course. That's when I knew this wasn't just food—it was a moment where simple technique and beautiful presentation combined into something people genuinely wanted to recreate. We talked about it for months afterward, and they still text me photos of their own pickled vegetable projects.
Flavor Combinations That Changed Everything
Once you master the basic brine, you realize it's a canvas waiting for your personal touch. I've learned that subtle changes completely transform the experience. If I want something brighter and more Asian-inspired, I swap out white vinegar for rice vinegar and add a thumb of sliced ginger and a few coriander seeds. For a more European picnic vibe, I use apple cider vinegar and add thyme instead of dill. The brine is forgiving enough to experiment with, but committed enough to stand on its own. I've even added strips of citrus zest—lemon, lime, or grapefruit—and it's like the brine learns to sing in a different key. The beautiful part is that you don't need to choose one way forever. Keep multiple jars going at once, and every time you open the fridge, you have options.
Storage and Longevity
These pickled vegetables will keep in the refrigerator for at least three weeks, sometimes longer, depending on how much you trust your intuition. I keep mine for weeks because the cool temperature essentially pauses everything. The flavors don't fade—they actually deepen and meld into something increasingly sophisticated. If you're fermenting naturally and not refrigerating, three to seven days is the sweet spot before things get really soft. Always trust your senses: if something smells wrong, looks slimy, or tastes off, trust that instinct and discard it. Food safety isn't about being paranoid; it's about respect for the process and your health.
When to Serve and How to Make It Shine
This board works beautifully at so many moments. For formal entertaining, arrange it as part of a charcuterie spread with crusty bread, aged cheeses, and cured meats. For casual gatherings, set it out as a vegetable-forward appetizer that makes everyone feel healthier about what they're eating. I've even served it alongside creamy dips—hummus, labneh, or even a tangy sour cream—because the sharp, clean flavors of pickled vegetables cut right through richness. The board also works as a side dish for rich mains like braised meats or creamy pasta. Pack leftovers into jars and bring them to potlucks where they'll be gone before anything else.
- Serve straight from the fridge so everything stays crisp and the flavors are bright and clean
- If serving on a warm day, remove from the fridge thirty minutes before serving for maximum flavor impact
- Pair with everything from Indian curries to French charcuterie to casual tacos—pickled vegetables are cosmopolitan and humble at once
 Save to Pinterest
 Every time I make this board, I'm reminded that some of the most impressive food comes from patience, not complexity. These vegetables taste like they took hours, but they only took minutes of active work and hours of sitting in the cold, becoming themselves.
Recipe Q&A
- → How long should the quick pickling brine be chilled before serving?
After pouring the warm brine over the vegetables, let the jars cool to room temperature, then refrigerate for at least 12 hours to develop balanced tang and texture.
- → Can I substitute vinegar types in the brine?
Yes, rice vinegar or apple cider vinegar can be used to create different flavor profiles while maintaining the pickling effect.
- → What vegetables work well for pickling and fermentation in this feast?
Carrots, cucumbers, radishes, cabbage, cauliflower, and green beans are excellent; seasonal options like beets or pearl onions also enhance variety.
- → How does the fermented version differ from quick pickling?
Fermentation uses a salt brine at room temperature for 5–7 days, developing deeper complex flavors and beneficial bacteria, unlike the faster, tangier quick pickling method.
- → What spices enhance the flavor of the pickled vegetables?
Mustard seeds, coriander seeds, black peppercorns, garlic, bay leaves, dill, and optional chili add aromatic and spicy notes to the brine.
- → Are there any allergen concerns with these preserved vegetables?
The dish is naturally free from common allergens like nuts, dairy, eggs, wheat, and soy, but verify store-bought kimchi or sauerkraut for possible additives.