 Save to Pinterest
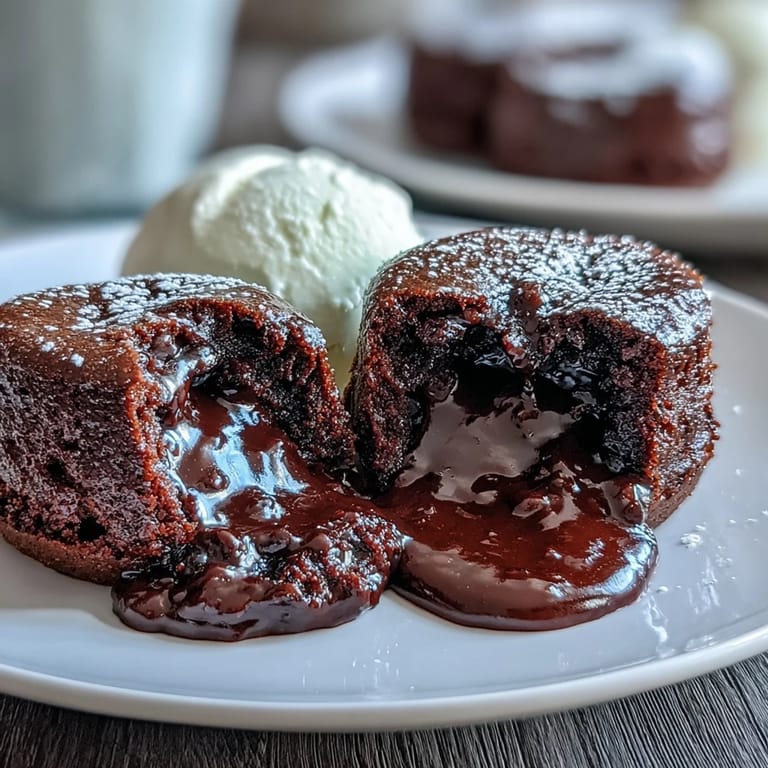
 The first batch I made cracked on top before I could flip them, and I nearly panicked until my neighbor tasted one anyway and closed her eyes. That molten center, dark and glossy with just enough bitterness from the espresso, made every wobbly step worthwhile. Now I keep ramekins ready because these cakes turn any Tuesday into an occasion. The smell alone, rich chocolate meeting coffee steam, fills the kitchen with a kind of quiet luxury that feels both earned and easy.
I served these at a small dinner party once, and the room went silent as soon as the first cake cracked open. My friend Michael, who usually skips dessert, scraped his plate clean and asked if I had another hidden in the oven. That night taught me that timing matters more than perfection: slightly underbaked is the whole point, and the edges will forgive you if the center stays soft. I still hear the small gasp when the chocolate spills out, and it never gets old.
Ingredients
- Bittersweet or semisweet chocolate (115 g): The foundation of the entire cake, so choose something you would eat on its own; cheap chocolate tastes flat here, and good chocolate blooms into something almost fruity when baked.
- Unsalted butter (115 g, plus extra for greasing): Adds richness and helps the cakes release cleanly from the ramekins, which matters more than you think when you are flipping them in front of someone.
- Large eggs (2) and egg yolks (2): The yolks make the batter silky and help create that molten center; I learned to separate them over a small bowl after losing one yolk to a shell.
- Granulated sugar (100 g): Just enough sweetness to balance the dark chocolate without making it cloying; you want depth, not candy.
- All purpose flour (30 g): A small amount gives structure without turning these into regular cake; sifting it in keeps the batter light.
- Instant espresso powder (1 tsp): Dissolves invisibly but amplifies every chocolatey note; even people who do not drink coffee never guess it is there.
- Pure vanilla extract (1 tsp): Rounds out the flavors and adds a faint warmth that feels like a secret ingredient.
- Pinch of salt: Sharpens everything and keeps the sweetness honest.
Tired of Takeout? 🥡
Get 10 meals you can make faster than delivery arrives. Seriously.
One email. No spam. Unsubscribe anytime.
Instructions
- Prep the Ramekins:
- Preheat your oven to 220°C (425°F), then butter each ramekin generously and dust with cocoa powder, tapping out the excess over the sink. This step is your insurance policy against cakes that stick, and I have never regretted the extra minute it takes.
- Melt the Chocolate:
- Set a heatproof bowl over a pan of simmering water and melt the chocolate and butter together, stirring until the mixture is smooth and glossy. Remove it from the heat and let it cool slightly so it does not scramble the eggs later.
- Whisk the Eggs:
- In a separate bowl, whisk the eggs, egg yolks, and sugar until the mixture turns pale and thick, about 2 to 3 minutes. Your arm will get tired, but this is where the cakes get their lift.
- Add the Espresso:
- Stir the espresso powder and vanilla extract into the cooled chocolate mixture until fully dissolved. The espresso will seem to disappear, but trust that it is working quietly in the background.
- Combine the Mixtures:
- Gently fold the chocolate mixture into the egg mixture using a spatula, turning the bowl as you go. Stop as soon as you see no more streaks; this is not bread dough, and overworking it will cost you tenderness.
- Fold in the Flour:
- Sift in the flour and salt, then fold gently until just combined. A few small lumps are fine; what you want is a batter that still feels airy and soft.
- Fill the Ramekins:
- Divide the batter evenly among the four prepared ramekins, filling each about three quarters full. I use a small ladle to keep things tidy, but a spoon works just as well.
- Bake:
- Place the ramekins on a baking sheet and bake for 11 to 13 minutes, until the edges are set but the centers jiggle slightly when you tap the sheet. Do not overbake; a minute too long and you lose the lava.
- Rest and Serve:
- Let the cakes rest for one minute, then run a thin knife around the edges to loosen them. Invert each ramekin onto a dessert plate, tap gently, and lift away; serve immediately while the centers are still molten.
 Save to Pinterest
 One winter evening, I made these for my sister after a long week, and we ate them standing at the counter with the oven still warm behind us. She cracked hers open with a spoon and said it tasted like something you would order at a restaurant, which felt better than any recipe review. These cakes have a way of making small moments feel significant, turning a regular night into something you remember months later. The molten center does not just taste good; it makes you slow down and pay attention.
Serving Suggestions
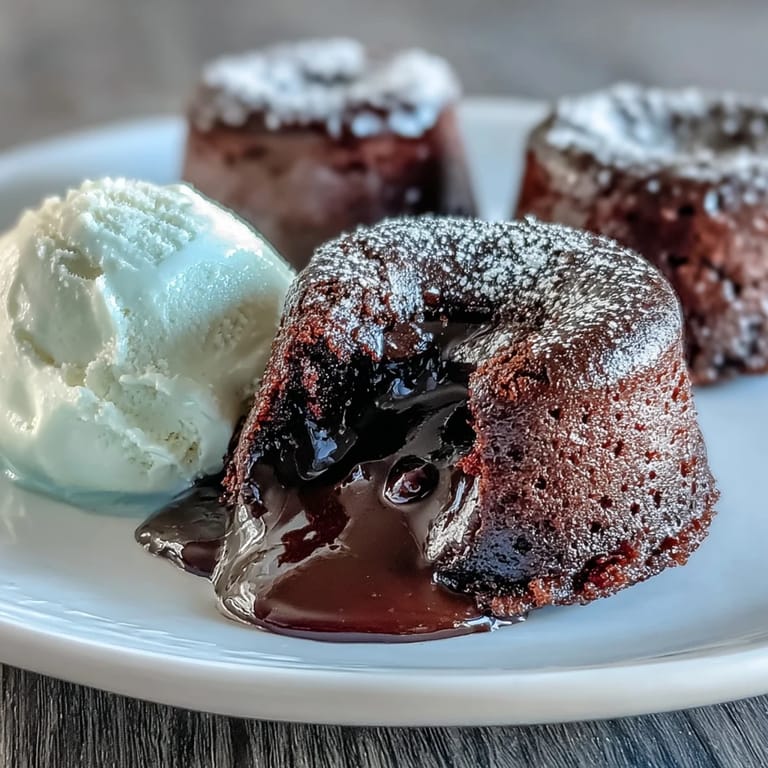
A scoop of vanilla ice cream on the side is almost mandatory; the cold cream melting into the warm chocolate creates a contrast that feels nearly perfect. I have also served these with barely sweetened whipped cream, a handful of fresh raspberries, or even a small pour of heavy cream around the base of the cake. Some people dust the tops with powdered sugar or cocoa, which looks elegant but is completely optional. The cake itself is the star, and everything else is just a quiet supporting role.
Make Ahead Tips
You can prepare the batter up to four hours ahead and keep the filled ramekins in the refrigerator, covered loosely with plastic wrap. Bring them to room temperature for about twenty minutes before baking, or add an extra minute or two in the oven if you are baking them straight from the fridge. I have done this for dinner parties, and it takes all the pressure off; you just slide them in while clearing the table. The batter does not freeze well, though, so keep this a same day project.
Adjustments and Variations
If you want a stronger coffee flavor, bump the espresso powder up to one and a half teaspoons; any more and it starts tasting like a mocha instead of a chocolate cake. You can also tuck a piece of chocolate or a spoonful of dulce de leche into the center of each ramekin before baking for an even richer surprise. Some people swap in dark rum or amaretto for the vanilla, which adds a grown up edge I really like. Just remember that the basic ratio of chocolate to eggs is what keeps the centers molten, so do not mess with that too much.
- Try orange zest in the batter for a subtle brightness that cuts through the richness.
- Swap semisweet chocolate for milk chocolate if you prefer something sweeter and less intense.
- Use decaf espresso powder if caffeine late at night keeps you awake; the flavor is almost identical.
 Save to Pinterest
 These little cakes have become my answer to almost every occasion that needs something special but not fussy. They prove that you do not need hours or complicated techniques to make dessert feel like an event, just good chocolate, careful timing, and the willingness to let the centers stay a little wild.
Recipe Q&A
- → How do I know when the lava cakes are perfectly done?
The edges should be firm and set while the center remains soft and jiggly. Bake for 11-13 minutes at 220°C (425°F). The tops will look slightly puffed but the middle should still move when gently shaken.
- → Can I make the batter ahead of time?
Yes, prepare the batter and fill the ramekins up to several hours in advance. Refrigerate covered, then bring to room temperature for 20-30 minutes before baking to ensure proper cooking.
- → What type of chocolate works best?
Use high-quality bittersweet or semisweet chocolate with 60-70% cocoa content. The chocolate quality directly impacts the final flavor, so choose a brand you enjoy eating on its own.
- → Why is espresso powder added?
Espresso powder enhances and deepens the chocolate flavor without making the dessert taste like coffee. It adds complexity and richness to the overall taste profile.
- → What should I serve with lava cakes?
Vanilla ice cream pairs beautifully as the cold creaminess contrasts with the warm molten center. Whipped cream, fresh berries, or a light dusting of powdered sugar also work wonderfully.
- → How do I prevent the cakes from sticking to ramekins?
Thoroughly butter the ramekins, ensuring all sides are coated. Dust with cocoa powder and tap out excess. This creates a non-stick barrier and adds extra chocolate flavor to the edges.